TinyMCE Advance vs Ultimate TinyMCE

TinyMCE Advanced vs Ultimate TinyMCE

TinyMCE and TinyMCE are plugins which are editors to facilitate the entry/editing of data when creating or updating post or pages within WordPress.

When in a post or page and using the visual editor, I believe either TinyMCE Advanced (by Andrew Ozz) or Ultimate TinyMCE (by Josh Lobe) is must. Both of the these plugins offer the same functionality but where the differences come in is in the setups.

TinyMCE Advanced

The plugin TinyMCE Advanced plugin can be found by entering your dashboard in WordPress, Plugins and clicking on “Add New”.  In the search bar, type in” tinymce advanced”.  Select it from the list provided and perform a normal plugin installation and activation.

After TinyMCE Advanced has been activated you will need to load the desired features in the post/pages edit bars.  To do that go into the settings and make the necessary changes.  The settings for TinyMCE are found in your dashboard in the “Setting” menu.
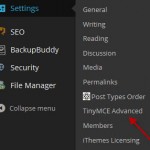
SettingsMenuTo add to the edit toolbar you just drag and drop the desired features, which are represented by an icon, from the bottom set of icons to the upper set of icons into the desired row.  See example below:
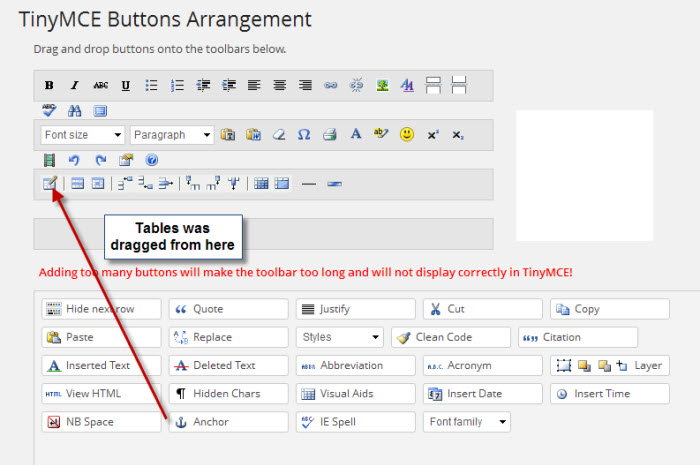
TablesAddedJust repeat the process until you have selected all the features that you need the most. (Note: Just apply those features you really need as loading too many features will slow down the page load).  Below the bottom set of icons there are additional features that can be turned on such as; Advanced Image, Advanced List Options, Context Menu and others.  I usually turn these on as well as “Stop removing the <p> and <br/> tags”.  This comes into play when looking at the code in the Text editor.

I have experienced some issues with this plugin stripping out HTML code that I entered in the Text editor and then reviewing the results in the Visual editor.  Other than that, I have been happy with this plugin.

 Ultimate TinyMCE

The plugin Ultimate TinyMCE provides the same functionality as TinyMCE Advanced but the setup is done differently.  Finding the plugin and installation is the same as TinyMCE Advanced with the exception that you are looking for “Ultimate TinyMCE”.

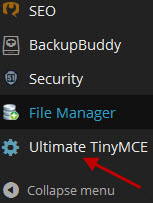
The access to the settings for Ultimate TinyMCE will be found in the dashboard.  Just click on Ultimate TinyMCE.

TinyMCEUltimateMenu

The plugin setup is completely different from that of TinyMCE Advanced.  This setup is comprised of setting check boxes and the desired row you that wish your icon to display on. In the list provided is just about any feature that you may need when editing.
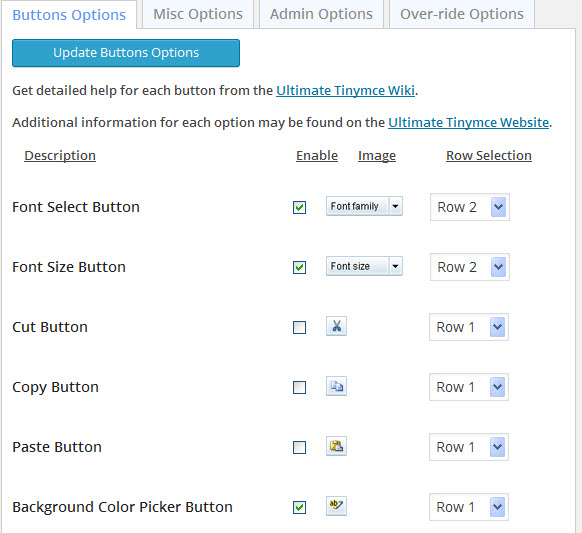
TinyMCEUltimateSettingsI have found this plugin to work a little better in some of the functionality.  For instance, it does a much better job in retaining HTML code that you may enter using the Text editor. Another thing that I like is the complete list of font sizes whereas TinyMCE Advanced gives you a list of the 7 most common sizes.

Summary

In summary, I like both of the these plugins.  I have found TinyMCE Advanced easier to set up the way I want it and Ultimate MCE seems to handle some of the functionality better.  Ultimate TinyMCE does have a Pro version which offers additional functionality for a price. I have used both of these plugins and continue to do on my websites. My suggestion would be try one or both, learn how it works and stick with it.

Chuck Ainsworth
AinsworthEtc.com

WordPress Plugin – Download Manager

Download Manager


One of my favorite plugins is the Download Manager by Shaon. This is a very handy plugin for those cases where you may need to download a PDF file, a zip file, a document, etc.  I use it on all my websites.

Installation

Installation of the plugin is standard plugin installation and a copy of it is available at WordPress.org. To locate just type in “download manager” in the plugin search. At the moment it is the first item on the list. Click on the title to be taken to the plugin download.

After installation there is minimal settings to review and the defaults works fine. While you are setting up if you are planning to have a lot of downloads, you may want use the Categories screen to create some categories to organize your downloads.

Creating Download Package

When preparing for a download you first create a Download Package.  This package contains the file to be downloaded, an icon to associate to the download, and a download label. The download label is preset to “Download” so if you forget the label, you are already covered. When loading the file, you can retrieve the file from your PC, using a loader that works the same as WordPress’s image loader,  or open a browser that will allow you navigate through your files on your web server. After you have your file, icon, and label, you just click on a button to create the download package.

Publishing With Download Package

Once the download package has been created you just copy the created shortcode into your post or page.  After you have published your post or page, the download is available for the public to download.

Summary

I have found the Download Manager plugin to be a great plugin for downloading online products.  I am currently using the free version but there is a Pro version that contains a lot more features.  I may be looking into this version sometime in the future.

Chuck
AinsworthEtc.com

WordPress Plugin – MailPoet

MailPoet

I have just recently started using MailPoet and it appears that I am way behind the times as there have been over half a million downloads.  I learned about MailPoet at the Phoenix WordCamp 2014 this year.  After seeing a presentation where it was being used, I thought I better look into it.  Particular after I discovered that it was free for the first 2000 subscribers. As I have just documented how to use it for my clients, I thought I would just go ahead write a blog regarding it.

Installing MailPoet

The easiest way that I found to find MailPoet is to go to WordPress.org plugins and do a plugin search for “MailPoet”.  You will get a list of about 10 items regarding MailPoet.  Look down through the list and find “MailPoet Newsletters (formerly Wysija)”. From here just click on the link and perform a normal plugin installation.

Adjusting Your Settings

To get started you will need to set your MailPoet settings.   The setup screen is broken down into 5 tabs.

  • Basics – For settings that affect the application in general. These include; the companies email address, user settings, unsubscribe button text, etc.
  • Forms – You can create new newsletter forms from this tab, what subscribers list the subscribers should be added to, and the wording of the opt-in confirmation.
  • Signup Confirmation – Here you can enable/disable email subscription confirmations.
  • Send With… – This tab is where you setup your mail servers.  This one gave me the most difficulties as I wanted to use either Mandrill or Gmail but my web hosting company blocks the ports they use.  (For additional fees, they would have given me a dedicated IP and unblocked the ports). I ended up getting email accounts at my web hosting company and using their servers.
  • Advanced – In the Advance tab you can set the privileges as to who can create newsletters and manage the subscribers.  It is also here where you set the reply name and address.
  • Premium – And if you like what you have but want more, just click on any item in the Premium list. These are paid features.

Subscribers

MailPoet gives you the ability to create a subscriber distribution list and then add subscribers to that list.  It includes an import/export to/from cvs file capability.  This is handy when you have a large list of subscribers to import.  After your subscribers have been entered you have list with the names of the lists that they have been assigned to and their status as to Subscribed, Unconfirmed, or Unsubscribed.

Creating the Newsletter

When creating the newsletter, you can start by clicking on the button “Create a new email” and this will give you a 5 step guide on setting up a new newsletter.  Personally I have found it easier to create a blank draft newsletter set the way I like and then duplicate it. The newsletter is broken down into a header, blocks of texts, and a footer.  You can add and delete blocks as you see fit to create your email.  Entering text  is very similar to entering text data into a post.

When satisfied with your newsletter, clicking on “Next step” will take you to screen to enter the email subject line and the lists of subscribers that you want emailed.  After clicking “Send” the email is now placed in a sending queue.  Here you have the option of sending immediately or waiting until the next send cycle.

Tweaking the Newsletter

To help layout the newsletter, there are four tabs with various capabilities.

  • Content – This a tab contains drag and drop modules for building up your newsletter.  Included is Titles & text, WordPress post (will bring a previously written post), Divider (numerous types of dividers), and Social media icons with links.
  • Images – Here you bring in images similar to bringing images into the media library.
  • Styles – This is where you set your text, h1, h2, h3 styles, link colors, and background colors.
  • Themes – There is download library of about 50 themes that you can choose from to tailor your newsletter.  There is also a guide one how to create your own theme.

Summary

MailPoet allows you to create very nice looking newsletters and meets the requirements for opt-in and opt-out email.  I have written up a training course that goes through each of the steps in preparing a newsletter in detail.  To access, click Here.

Chuck at AinsworthEtc.com 

WordPress Plugin – Sensei

Sensei

One of the plugins that I have recently started using is “Sensei” by WooThemes.  Sensei is a paid plugin that enables you to create online content for training purposes.   I wanted to create a WordPress course for my clients and had heard about Sensei so thought, why not give it try.  The main features include: Course Catagories, Courses, Lessons, Quizzes, Grading, and Analysis.  Sensei comes with a starter course set to help you get started on the learning curve.  After reviewing I deleted it and started my own.  Really wasn’t that difficult.

When first getting started you will need to go through the Settings page and adjust to your needs. If doing courses for a fee, there are settings at the bottom of the screen for this purpose and it has an interface into WooCommerce.  You have settings that apply to Sensei in general, Courses, Lessons, Learner Profiles, and WooCommerce.

Course Categories

Sensei gives you the ability to layout your courses by catagories and then as the courses are being entered, it keeps track of how many courses are in a specific category. When first setting up Sensei, I would start with entering at least a couple of categories.  I started with “Beginner”, “Intermediate”, and “Advanced”.  You would need to choose categories based on your needs.

Courses

As Sensei is delivered the courses are sorted down by date and time. I found this very troublesome as I didn’t know what all my courses would be when first starting and it is tedious to go back and adjust the date and time to obtain the order you wish.

As a result, I have written a plugin that allows you to re-order the courses using a drag and drop interface. This plugin does require a sort order change in the plugin itself.  I have documented the required changes in the readme.txt of the plugin.  (The plugin has not been formally released as I still have one gotcha when traversing the courses).

There are a lot of things that I like about Sensei and one of them is the course overview.  When first clicking on course tab, all the Courses are listed in order of presentation. (This is the order my plugin enables changes for).  A course overview includes the course name, author (if not turned off), number of lessons in the course and the category. When clicking on the course name, you are taken to the first lesson.  There you can click on the “Start taking this course” button and your lesson details will be tracked for the instructor.

Lessons

Setting up a lesson is done the same way as entering a page or post as it used the same editors.  Just enter your content the same way including images. Another nice feature is the ability to add lesson complexity, videos, and quizzes for each lesson.

Here again I had difficulties with the date/time format for sorting down the lessons as the plugin is released.  (My plugin as mentioned under courses resolves this). In lessons the traversing works great when re-ordering the lessons).

Quizzes

After you have a saved a lesson, you then have the ability to add a quiz for that lesson.  This can be in the form of multiple choice, true/false, fill in the gaps, essays,  single line replies or multi-line line replies.

Grading

In the grading section, you can grade each learner manually or you have the system perform an Auto grade.  Also you can reset the grade if so needed.

Analysis

There is an analysis module that gives the overall stats of the training course.  Included is total course count, total lesson count, number of learners, average number of courses being taken by learners, and the overall average grade.   Each learner is listed along with their number of active courses, completed courses, and average grade.

Summary

In summary I believe this is a great module for online training and only limited by your imagination.  There are a lot of features provided and I am sure that I have not exploited them all yet.  Would I recommend it!  You bet…

Chuck Ainsworthetc.com